
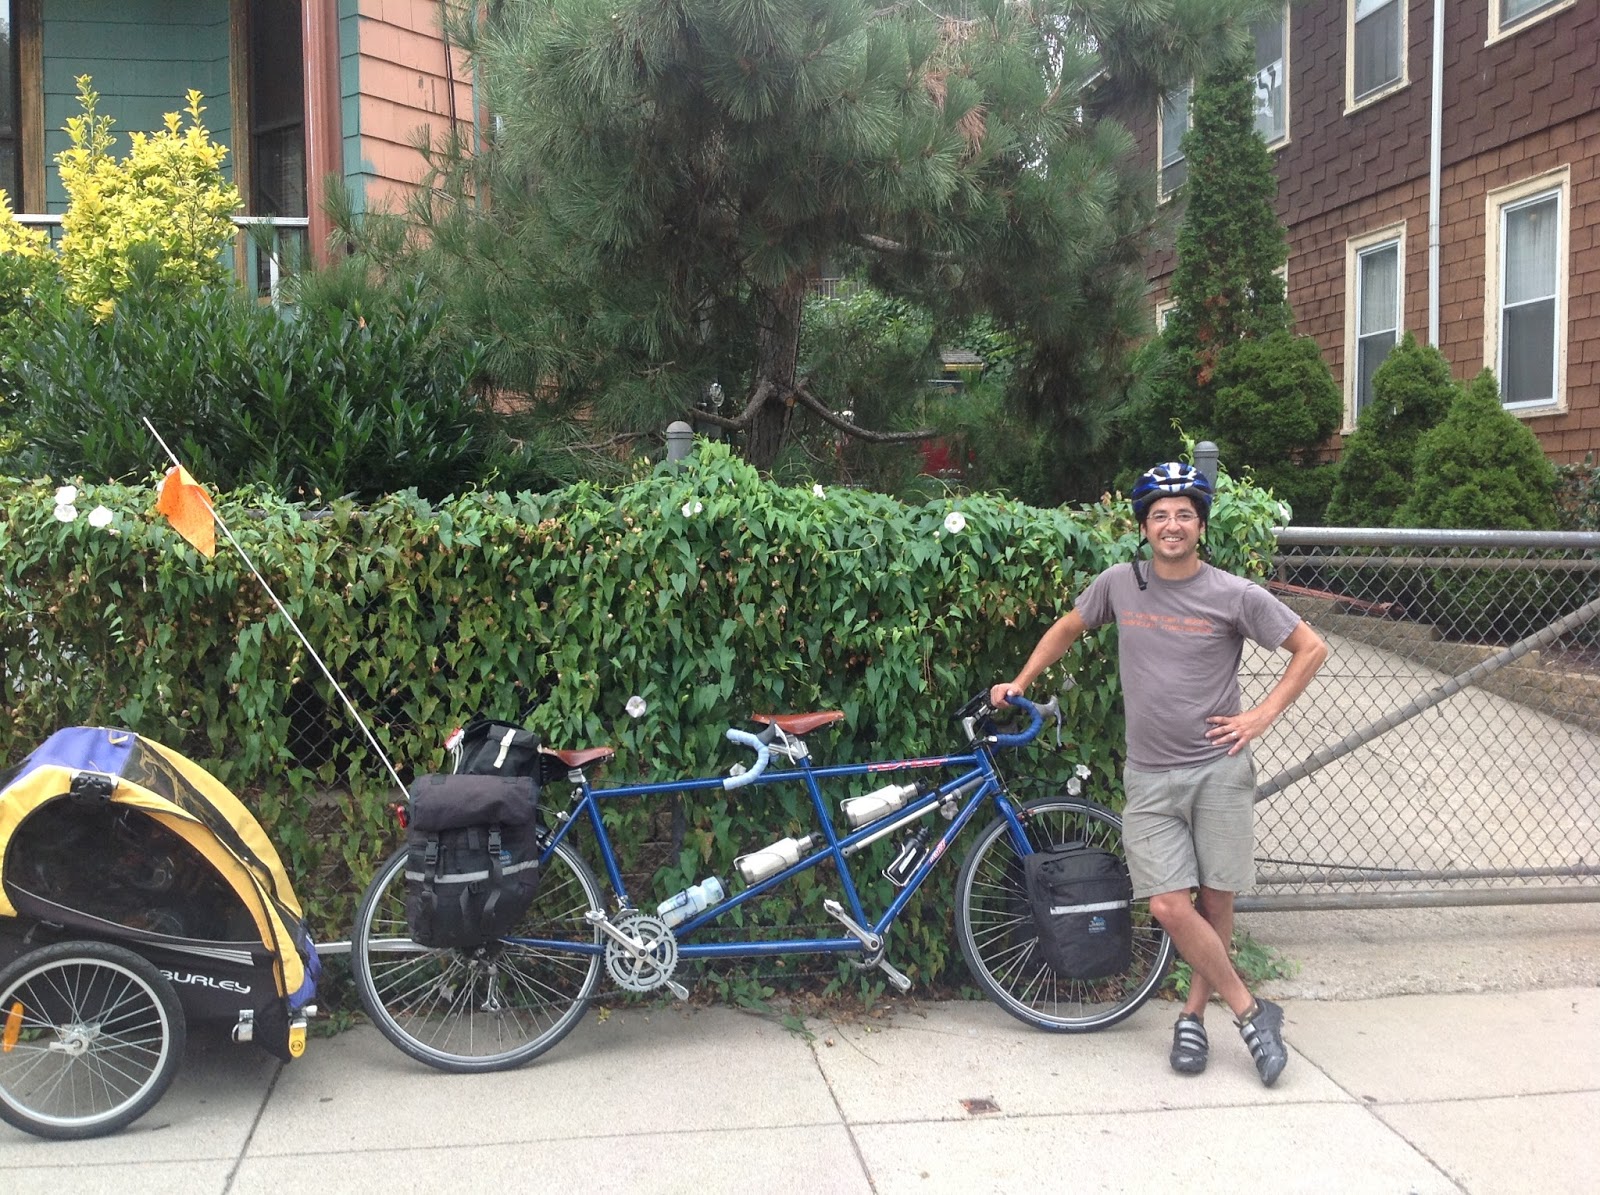
I had been on the lookout for a good deal on a tandem when about 1 year ago I spied an old (late '80's-early 90's as far as I can tell) Nashbar Tandem 9000 on Craigslist. If I recall correctly, the person was asking $150-$200 for it. This was already a good deal, as it seems impossible to find someone that believes their shitty tandem is worth anything less than $1000, regardless of condition. Perhaps because it was listed on CL, I felt compelled to see if they would take less. I offered $100, and told the person that I would need for them to deliver it, as I had no way to pick up a bike that I couldn't ride home (the tires were rotted) and while I had three bike racks on the roof of my car none were capable of carrying a tandem (not to mention the person lived far from the city and I didn't feel like schlepping). Amazingly my offer was accepted, and two young guys showed up at my apartment the next evening with the following:
.JPG)
The big blue Nashbar 9000 tandem that was dropped off was in relatively decent structural shape, but as I got deeper into the restoration I realized that -shocker- this was a bike that had actually been ridden by its owners, and quite a lot it seemed.
My first attempt at making this land ship roadworthy was geared towards doing it on the cheap, and so I replaced as little as was necessary:
- I re-cabled and re-housed the drum brake, both rim brakes and both derailers
- I replaced the tubes and rotted tires with Schwalbe Marathon 27 x 1 1/4" rubber (the best 27" tires that I could identify)
- I bought matching honey brown Brooks saddles used on eBay. A B17 for the captain and a Flyer for the rear admiral
- I bought a cheapo seatpost for the rear admiral, as there was none when I got the bike
- I put new Cinelli cork handlebar tape on both sets of handlebars
- I replaced the brake pads on the cantilevers with salmon Kool Stop pads
- I put on rear and front racks that I had lying around
.JPG)
At that point, my wife controlled the drag brake through an aero lever that was mounted to her bars. The other rear lever served as a dummy lever and comfortable place to put her hands.
That was when I got ambitious and decided that we were ready to go cycle touring to and in Acadia National Park.
I borrowed a Burley child trailer from a friend and we hoped to hop the Amtrak Downeaster to the end of the line, at which point we planned on cycling the roughly 150 miles to the park and then exploring the carriage roads on 2 wheels. That crazy setup looked like this:
When I was loading the bike onto the train at South Station in downtown Boston, the conductor mentioned that he didn't think that tandems were allowed in the bike car. I had planned an entire week-long vacation around being able to bring the bike on the train, and had never seen anything mentioning this fact on the Amtrak website, so I argued vociferously that it would be fine and that he was wrong. "Lucky" for me, I won the argument and slid the bike into a diagonally oriented rack that simply held the front wheel. At first I said that due to the length of the steed I wanted to just lay the bike on its side, as I didn't trust the rack, but the conductor wasn't having it. At that point I felt lucky to get the bike on there, so I didn't argue.
When the train pulled into the final destination, the conductor approached me to inform me (in a very deferential and apologetic manner) that something bad had happened to my bike on the ride. I walked back to the bike car to find the front wheel completely taco'd. Apparently the bike had tipped during transit and the front wheel stayed in place, thus the Mexican fiesta in the front.
I think I felt as bad as the conductor. He gave me the phone number of a supervisor to call (the following Monday, it was Saturday at this point) who would take care of reimbursing me for the damage. Owing to my obstinacy, I felt partially responsible. Furthermore, I'm a huge believer in rail travel, and I didn't want to do something that I felt would further damage the already enfeebled finances of Amtrak. If I had felt entirely guiltless, I would not have taken this approach, but I accepted the responsibility that I thought I deserved. My wife was not as understanding (this was our one-and-only one week summer vacation that had potentially been ruined after all).
There was a bike shop very close to the train station, but they did not stock 48-hole 27" rims (imagine!). I was weary of what they had in stock supporting our heavy load.
This is what the bike (and my trooper of a wife) looked like once we got off the train:

I decided that the only way to salvage the vacation was to take the train back to Boston with the tandem, go home, drop off the tandem and put two "regular" bikes on the roof of the car and drive back up. Thus my dreams of a car-free vacation were dashed, but the vacation was salvaged.
The carriage roads of Acadia provide for miles of stress-free riding, and we subsequently had a terrific vacation on 4 wheels instead of two:
 |
| Can't do that with a tandem |
It's been a long, cold winter in Boston, so anything that can occupy a few hours of indoor time is always in demand. Fortunately I am happy to come home from work and spend an hour or two working on bike projects before dinner (and my wife is kind enough to oblige this indulgence).
So here begins what you've probably come to this post for: the dirty details of what I did to the bike to turn it into one that I could really be excited about.
First thing's first: a 27"-700c conversion was necessary. The tire selection for 27" rubber stinks, and I wanted something much juicier than what I could find in imperial dimensions. I've mentioned before my affinity for Schwalbe Marathon Supreme's, and the tandem was the perfect opportunity to put them on in their fattest form: 45c. I don't think it would have been a problem had the bike originally been designed for 700c wheels, but the small decrease from 27"->700c probably made this a tad easier.

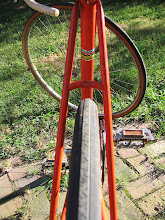
Of course I needed new wheels to match the rubber, so I used this as an opportunity to use my 32-hole Ultegra hub mated to a Mavic A319 rim that was on my Bridgestone RB-T (replacing that with a SON28 on the BStone). I reused the rear hub from the tandem (a sealed bearing 48-hole Sansin designed for the already present Arai drum brake) and asked Elton at Harris Cyclery to build me a new wheel mated to a NMSW Velocity Atlas. Every other reference to "bombproof" wheels in the history of the internet should point to the below pictures:


When Velo Orange announced their "Crazy Bars" I immediately decided that I needed two sets of them. I missed out on the first round, but I got in on the second and swapped out both front and rear drops for these very practical (and admittedly bizarre) h'bars.


Only problem was that the OEM quill didn't work with bars like these, so I needed to convert to a threadless-type stem. I originally assumed that the stem was a standard 1" quill, but I was mistaken. This steed takes a somewhat unique 1-1/8" quill. Fortunately, Universal Cycles had a 1-1/8" quill to threadless adapter, to which I attached a Profile Design stem:

I also took the Nitto rando rack that was previously on my commuter and put it on this bike. All I had to do was buy some fork blade clamps (from Bikes Not Bombs).
 |
| Clamps not actually visible in this picture, but they are elsewhere. That's a Rivendell Trunksack. |


In the upright portion, I went with JTek AeroBrake Clamp-on Style levers, as most typical inverse levers require a larger diameter than the roughly 17.6mm that is present on the VO Crazy Bars. Plus, I figured I might as well keep all the brake levers in the same family and I'm always interested in supporting small-scale American bicycle parts manufacturers:

.JPG) |
| I subsequently got somewhat Bob-ish and finished the cork bar tape with nylon string (not hemp or cotton...) |
Four brake levers and only two brakes (not including the Arai drag/drum brake which we'll get to later). I originally ordered a DoubleControl Model L from JTek engineering as well, but once I received it I decided that I would like to have the integrated spring that is present in the Problem Solvers version of the same device. I also was not very happy with what appeared to be pretty rough tolerances in the JTek version.
 |
| This image is from JTek's website. You can see their DoubleControl just below where the stem would connect. |

So far it doesn't appear that I need to cinch the doublers to the bars to prevent rattling, but if I do I'll have to figure out something more elgegant than zip-ties, probably twine and do a similar treatment to the ends of the h'bars.


 |
| The brake is engaged in this picture. Using a barcon allows you to have a parking brake, which is very handy with an unwieldy steed like a tandem. |
 |
| The Ritchey Break-Away Quick Disconnect (DERAILER VERSION) is just to the left of the lever arm. |
I replaced the cantilever brakes with Tektro mini-V's, and I pull Kool Stop pads on them (natch). I also ordered Jagwire adjustable noodles as all of the reviews I read of the brakes said they were a worthy addition (and cheap one at that at ~$4 each). The canti's were interfering with my racks, and I read that people liked them, so I figured why not. So far they've been great and they give me plenty of flexibility in pad placement despite the 27"->700c conversion.
 |
| I no longer need the cable hanger that is attached to the seatpost bolt, but I haven't removed it yet. |

Other details that are not particularly photo-worthy:
- Both bottom brackets were replaced with modern, sealed bearing variety. (I actually can't remember what I put in there, but I think they are VO).
- I replaced the freewheel with a modern Shimano 7-speed
- The primary chain was replaced with a SRAM something-or-other
- Al housing and cables were replaced
- The original Suntour barcons were replaced with Shimano friction shifters. I've since learned that the Suntour barcons are relatively desirable. I don't know why, as I found them to be inferior to Shimano. I sold them on eBay. I also removed the Suntour cantilever brakes, as they no longer reached after the 700c conversion. I'm going to sell them, I just haven't yet.
- I put on four generic silver aluminum bottle cages
- the pedals are constantly changing
- the original Suntour F&R derailers remain for the time being, as do the triple chainrings.


I would be remiss if I did not thank the wonderfully helpfull people on the Internet Bridgestone Owner's Bunch (iBob) list. It's the perfect place to get advice on a project like this.
We're ready for rando season!
Hope to see you at some NER events this spring, and hopefully at PBP 2015...
.JPG)


2 comments:
Great job recording your project! I'm particularly interested because I found a '90s burley tandem thus winter that I'd like to do the same kind of refresh to. Do you find that the drag brake is worth the effort especially with the v brake conversion? Ive got one as well but was considering getting rid of it during the refresh and 700c conversion...
We have not put much mileage on this build, so I'm hesitant to say one way or the other. That being said, the ability to set a parking brake is terrific, and on the brief bit of hills on which we took the test ride I appreciated the ability to set the drag brake at roughly 50% and then continue down the rest of the hill without my wife screaming to slow down.
My gut says keep the drag brake. Tandems are already tanks (especially ones of this vintage) so the extra pound or two from the Arai is insignificant. I can see the brake being very useful when we get to the mountains and I don't want to have to squeeze the V's for 20 minutes on a descent (and worry about overheating the rims).
Post a Comment